Friday, March 25, 2011

Winding Embroidery Thread


Click on any image to enlarge.

 Last week all the old projects came out to play.
Sorting through them and getting them set to stitch should I get my knee replacement this summer.
It is good to get them available at any rate. A great way to pass the time at the allergist when we go to get our weekly shots
The old towel was my Mothers. It is my hope to restore it.
 My Sweet MILove drew out the crewel work years ago. One day this will also get created.
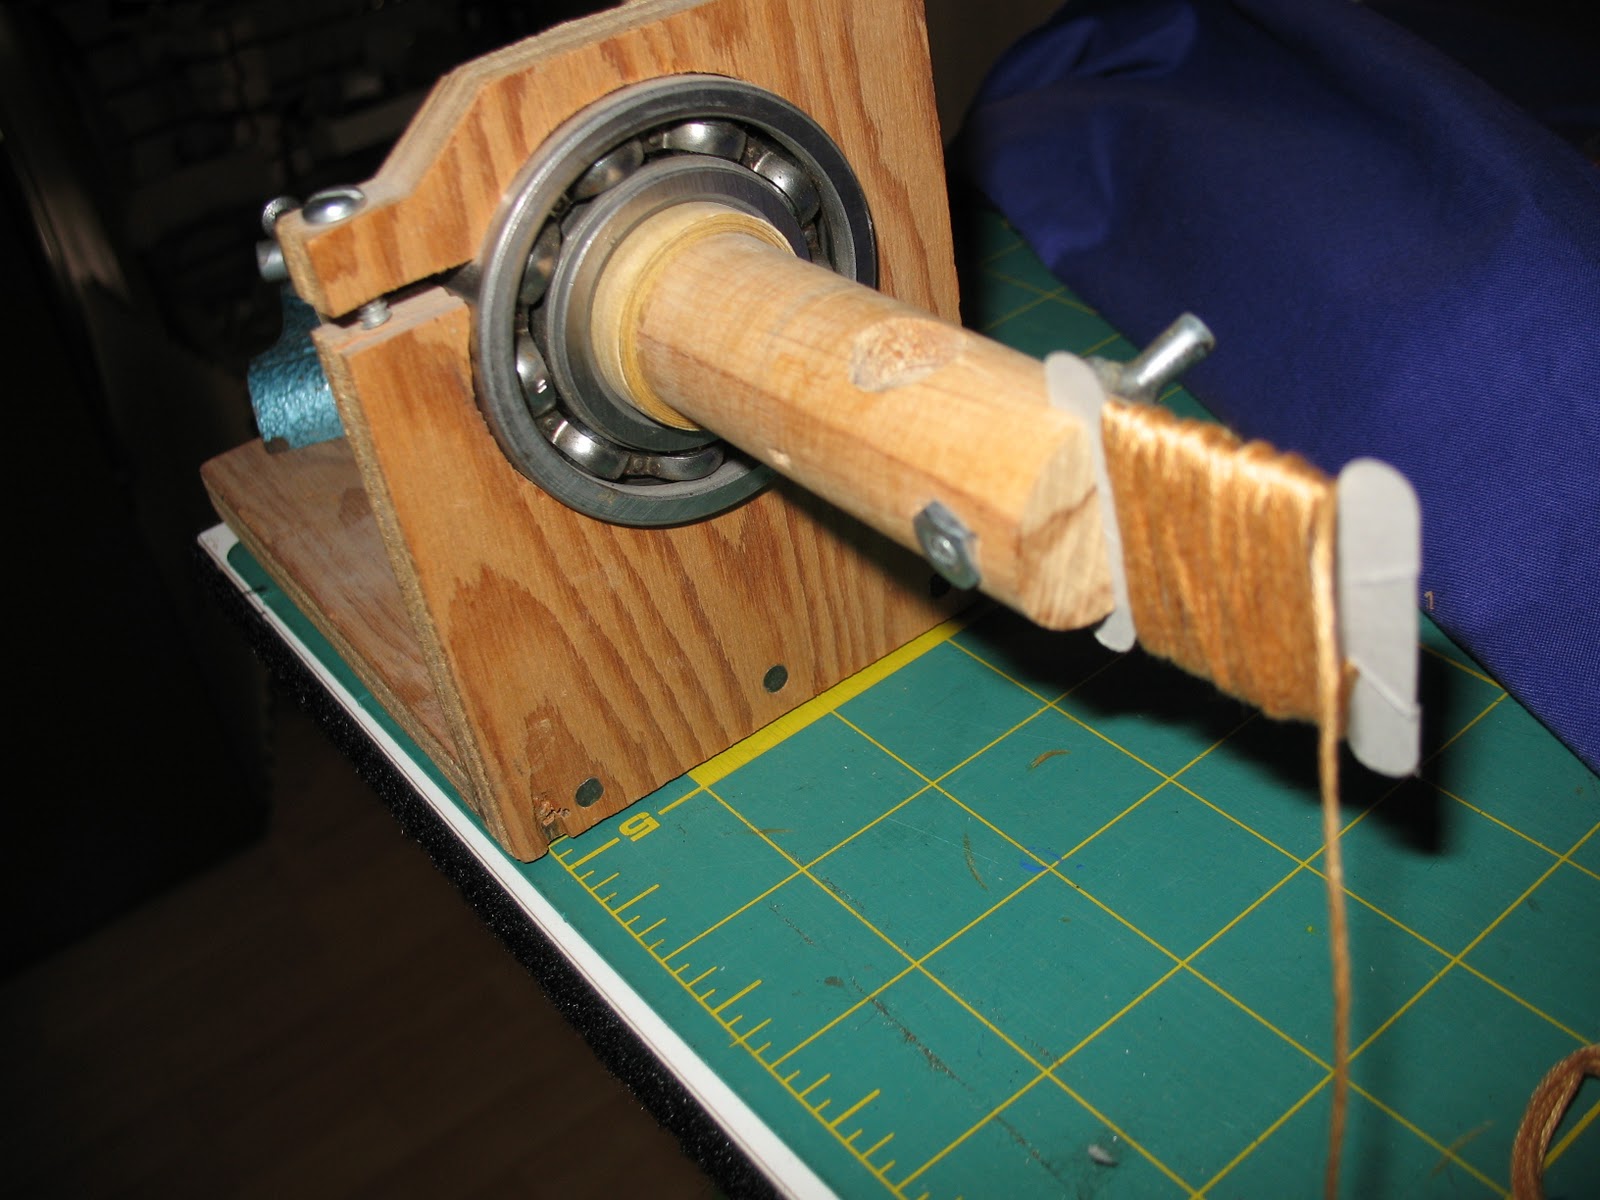
 The last of the thread needed to get spun onto cards. Now this is the cool part. Years ago my husband saw me doing this by hand. He vanished for a while only to return with a wonderful invention. This was some 15+ years ago. Lable each card with the maker and number, color. Then have at it. Sort by number.
 This is his creation. It has ball bearings.


Winding Embroidery Thread

Sunday, February 27, 2011

How to make a cover for CPAP Machine

Obstructive Sleep Apnea is a serious health issue. With so many folks now using CPAP machines to protect their hearts many face unforeseen problems.

The Benefits of Heated Humidification and CPAP are many but a problem occurs with condensation.

Condensation is a real issue with my CPAP (continuous positive airway pressure) machine. When the room temperature is cooler than the air flowing in the tube condensation occurs.

 Most knits come in a yardage that is a tube with two edges on the fold. Using the both folds of 3 1/2 yards the casing was cut. Now you can make several sections, I made two. Making more that one long section is my suggestion. they will be much easier to turn out.
 Three inches wide was the cut.
 Simply baste stitch the length. No need to make a fine or small width stitch. This snuggy will need little strength given it's purpose.
 Yet the setting is for fine knit stitch one the ends once turned.
Make the turn much deeper than needed so it is easier to grip.
Sew and turn.
 Clip
The knit stitch will give it the stretch you will need to removed it for laundry once in a while

 By making it a very long sections of tubing it will gather. 
This will create a much more insulated effect.
Mine is made to match my bedroom decor.
I found the ones on the market  do not match my room.
They are not made very well at all, and are shorter than this, thus not as much of an insulator.
If you would like to special order one leave me a comment.
Pay Pal excepted. Medical equipment

Steelers, pontiacs and fire. A quilt for my boy

 One all the squares were cut and the strips laid out one the cutting table the process was in full swing.
 Now the last Pontiac was made at the end of last year. They one day will be collected, as even now many of the large engine ones are prized with drivers.
 A hot iron is a MUST
 Make sure to press all seams in same direction. This is so important for the finished top. By starting out with a mat and rotary cutter the job is well done. I used a 7 inch quilt square rule. The finished block will be 6 inches once the seams are taken into account.
 Now my boy loves the Steelers. Searching I found the backing for the quilt. We watched the Supper Bowl and although his team lost he still loves them. The other team just played a much better game. This coming from a 9 year old. The fabrics must all be washed before any cutting.

 By using the large clips and clamps the quilt can be rolled up to begin the quilting. Now I do not profess to be a skilled and perfected artist of quilts. My son needed a new quilt. His birthday is in the beginning of March.

 Sitting with a child ill with the flu the blocks were quilted together with a running stitch. Now I used button thread. I had to use pliers every three stitches all the way through the project. My hands were not strong enough to pull the threads. Skilled quilters would roll over in their hoops! This is for a BOY! My son is so hard on things. This was also what I had. Using what you have on hand is a good thing. It may lack a bit of perfection but it to me is a wise use of resources. The last of the black blocks done the binding began
 Now the binding also was something I had. It was discovered at a garage sale of a sewing store that had closed its doors. $.10 cents a package. I have just about every color and several of them. The quilt took three of them.
 By stitching the binding to the front I was able to fudge the places where the backing came just a bit narrow.
 Stitch just right on the fold line. Then turn and press flat open. Then turn over the edge. Now see this is not a Perfect job gals. My boy has a blanket.
 Then fold and hand stitch the back binding so as to have a nice finished edge that does not show on the front of the quilt.
I began the binding on the back early in the evening and got around 5/8 of it done by midnight.
My son sat and watched me do it. He was so appreciative. He said that he wants to learn how to sew.
I have always wished my daughter would show interest who knew that it would be my son who wants to learn.
Just a simple whip stitch

Tip here
allways use the thread as it comes off of the spool
It has a warp and if you do otherwise your thread will tangle.

Monday, November 1, 2010

Tuesday, October 26, 2010

costume from a t-shirt

 Here is a large shirt.
Cut off just under sleeves.
Use the hem of the shirt as a casing and thread your elastic through and pin.
That will be the waist


do a wide basting stitch to gather the edge of the organza

pin on gathered organza The other edge in this job was a salvage so it was used to my advantage

trim the seam close once the seam has been fully encased in this application I used an overcast


 this product was very helpful
I placed it under the organza edge.
It just pulled off when the seam was finished. 
Without it the machine will eat your fabric


 The edge is turned right sides up and top stitched for added strength.
 trimmed right to the edge


 This is from what was left of the neck of the shirt

 The red was changed out for greed ribbon

 A dollar white t shirt from the thrift shop became the base or foundation for the bodice.
It is a monster bride costume.
The arms of the shirt are white glove-lets.
Yes that is a needle in my lips.This a work in process changes as details are tweaked to her liking

 This is a very big stretch for me.
It is important to me that my child see me overcome my own feeling,
The best examples can be found in humility


 My daughter came up to get her homework binder signed. She took a few pictures. 
She is very happy with the work so far.  "MOM, mom..look up"
 She got me.
I'll try to get a photo tomorrow of the mascaraed costume